Nail Art: 45 Easy Nail Designs for Beginners to Try at Home

Have you ever scrolled through Instagram and stared at a stunning manicure thinking, “There’s absolutely no way I could do that”? You’re not alone. Most beginners feel exactly that way before they try their first easy nail art design at home. Here’s the truth: the gap between “I can’t do this” and “I just did this” is smaller than you think. With the right guidance, the right tools, and a little patience, easy nail designs for beginners are completely achievable in your living room, at your kitchen table, or wherever you feel most comfortable. No salon appointment needed. No professional training required.
This guide covers 45 easy nail designs that any beginner can try at home in 2025. Whether you want simple polka dots, modern French tip nail art, trendy aura nails, or bold geometric nail patterns everything is here, broken down step by step in plain, friendly language. The DIY nail art community has exploded on TikTok and Pinterest over the past few years, and the tools, tutorials, and inspiration available today make nail art at home more accessible than it has ever been. So settle in, pick a design that makes your eyes light up, and let’s get started.
Read More About: 35 Best Fall Nail Designs to Try This Season Your Ultimate 2025 Guide
Nail Art Basics for Beginners
Starting with the basics isn’t boring it’s the smartest move you can make. Every professional nail artist you’ve ever admired started exactly where you are right now: no experience, a few bottles of polish, and a lot of curiosity. Beginner nail art success comes down to three foundational pillars: nail preparation, the right tools, and a basic understanding of technique. Get those three things right and the designs you create will surprise you. Skip them and even the simplest pattern will look rushed and unpolished.
Think of beginner-friendly nail designs the way you’d think about baking. The recipe matters but so does your oven temperature, your pan preparation, and your ingredient quality. Nail art works the same way. A dotting tool, a thin liner brush, a quality base coat, and a reliable top coat will serve you better than a drawer full of mediocre supplies. Invest a little thought into your setup before you dive into designs and every application experience becomes more enjoyable and more successful.
Essential Nail Art Tools and Supplies
The right tools make easy nail art designs genuinely easy. You don’t need a professional kit to create beautiful nails at home. A lean, well-chosen beginner toolkit covers the vast majority of designs in this guide and the total cost stays well under twenty dollars if you shop smart.
| Tool | Essential or Optional | Cost Range | Best For |
| Dotting tool | Essential | $3–$8 | Dot nail art, flowers, hearts |
| Thin liner brush | Essential | $4–$10 | Striping brush nail art, details |
| Nail art pen | Essential | $5–$12 | Freehand beginner nail art |
| Striping tape | Essential | $2–$5 | Geometric, French tips, clean edges |
| Base coat | Essential | $5–$12 | Nail protection and adhesion |
| Top coat | Essential | $5–$15 | Sealing designs, adding shine |
| Stamping plates | Optional | $8–$20 | Complex nail art patterns |
| Rhinestones | Optional | $3–$10 | Embellishments, glitter nail art |
| Nail foil | Optional | $4–$12 | Chrome and metallic finishes |
| Nail stickers | Optional | $3–$8 | Quick beginner-friendly nail designs |
Brands like Born Pretty, Makartt, and KADS offer solid beginner kits at accessible price points. You’ll find most of these tools available on or at your local beauty supply store. Start with the essentials. Add optional tools as your skills grow and your design ambitions expand.
Hand and Nail Care Before Nail Art
Nail prep is the step most beginners skip and it’s the step that determines everything. A clean, smooth, properly prepared nail surface holds polish longer, prevents lifting at the edges, and gives your nail art at home a professional-looking finish from the very first application. Think of it as priming a canvas before painting. You wouldn’t paint directly on rough, dusty wood. Your nails deserve the same consideration.
The prep routine is quick and simple. Remove any old polish completely using an acetone-based remover. File your nails to your preferred shape using a medium-grit file, always moving in one direction rather than sawing back and forth. Buff the surface lightly to remove shine and create texture for adhesion. Push back your cuticles gently using a cuticle pusher never cut them unless you’re experienced. Wash your hands thoroughly then swipe each nail with a nail dehydrator or plain white vinegar to remove natural oils. That last step alone dramatically extends how long your long-lasting manicure stays chip-free. Apply cuticle oil only after your manicure is completely finished never before since oil prevents polish from adhering properly.
Basic Nail Art Techniques Every Beginner Should Learn
Five foundational techniques unlock the majority of simple nail art ideas in this guide. You don’t need to master all five before starting. Learn two, practice them until they feel comfortable, and you’ll have enough skill to create dozens of genuinely beautiful designs.
The first technique is dotting the gateway skill of beginner nail art at home simple enough for literally anyone. Load a dotting tool or bobby pin with polish and press it onto the nail with steady, consistent pressure. The second technique is tape striping: apply striping tape to a dry base color, paint over the exposed areas, and peel the tape while your top color is still slightly wet. Clean lines every time, no steady hand required. The third is sponge gradient load two colors onto a makeup sponge and dab them onto your nail repeatedly, building a soft ombré effect layer by layer. The fourth is freehand line work using a thin liner brush: slow, deliberate strokes that create curves, petals, and details with surprising precision once you practice. The fifth is stamping pressing a stamping plate design onto your nail with a roller tool. Complex patterns with zero drawing skill required. Master any two of these five techniques and this entire guide opens up to you immediately.
Easy Nail Art Designs for Beginners
The five designs in this section are the most accessible easy nail designs for beginners available anywhere. Each one requires minimal tools, uses no more than three polish colors, and takes under thirty minutes from base coat to finished top coat. These designs consistently produce results that look intentional and polished even on a first attempt. They’re also the best foundation for developing the muscle memory and confidence that more complex designs require later.
Start with whichever design speaks to you most. There’s no correct order. Cute nail designs should feel fun and personal from the very first attempt not like homework you have to complete in sequence. Whether you gravitate toward dot nail art, delicate hearts, simple florals, cheerful stripes, or organic feather textures, you’ll find your entry point here.
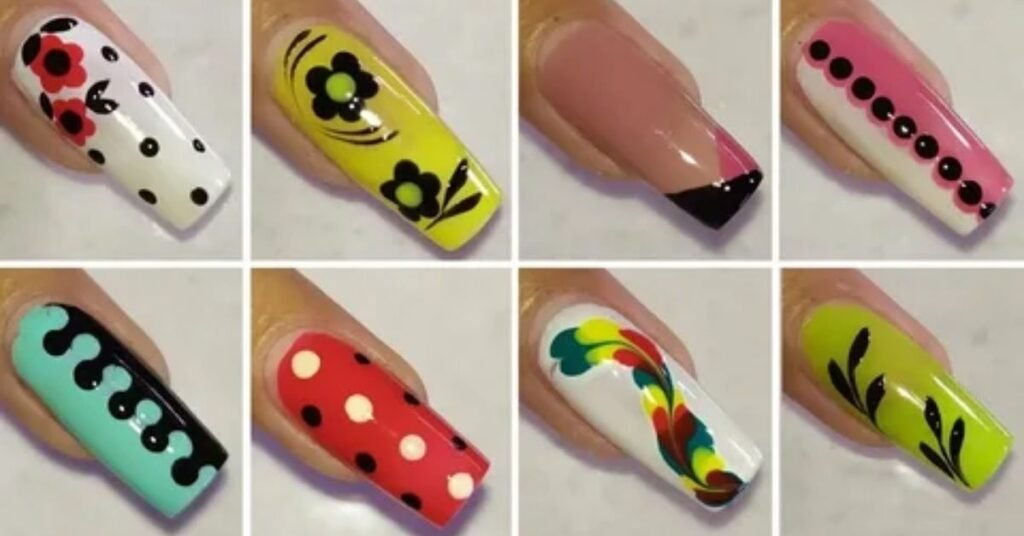
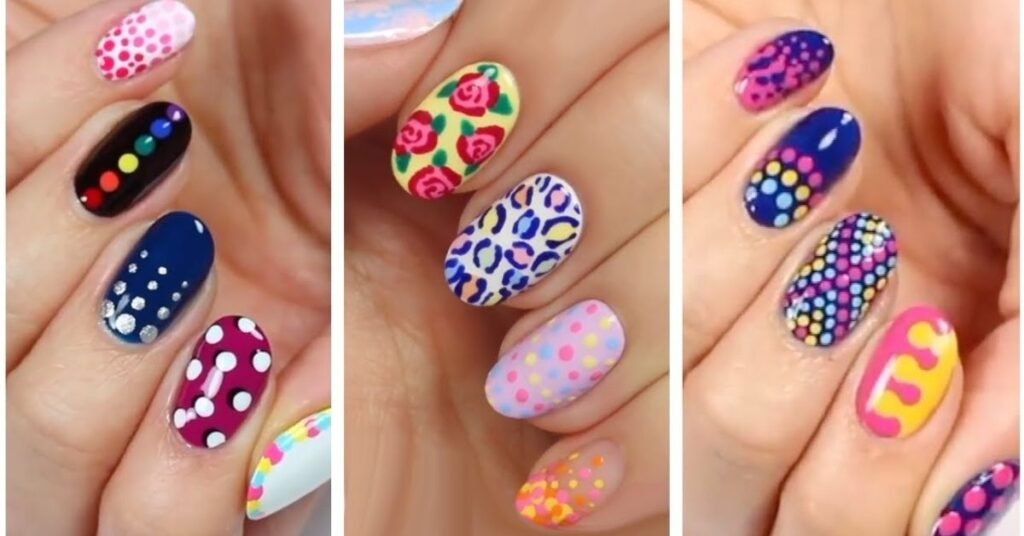
Polka Dot Nail Art
Dot nail art is the single most recommended starting point for anyone beginning their beginner nail art journey and for genuinely good reason. It requires no artistic skill, produces consistent results on the first attempt, and looks intentionally designed rather than accidentally simple. A dotting tool pressed onto a dry base color creates a perfect circle every single time. That reliability is enormously confidence-building when you’re just starting out.
The technique couldn’t be more straightforward. Apply your base coat and let it dry. Apply two thin coats of your chosen base color and allow them to dry fully. Load your dotting tool with a contrasting polish color dip, blot once on paper to remove excess, then press firmly and evenly onto the nail. Lift straight up. Perfect dot. Repeat in whatever pattern appeals to you: scattered randomly for an organic feel, arranged in a diagonal grid for structure, or graduated from large to small across the nail for visual interest. Finish with a quality top coat and you’re done. Color combination ideas that consistently work well include white dots on black, gold stripe nails adjacent to gold dots on navy, cream dots on chocolate brown, and mismatched pastel nails with each nail featuring a different pastel base and contrasting dot color. Difficulty: one out of five. Time required: fifteen to twenty minutes.
Heart Nail Art
Black heart nails, red hearts on nude, or tiny white hearts on deep burgundy the heart motif is universally appealing and surprisingly simple to execute with the right technique. There are two approaches that work well for beginners. The first is the double-dot method: place two dots side by side at the top of the nail using a dotting tool, then drag each dot downward and inward with a toothpick until they meet at a point. The result is a clean, recognizable heart shape without any freehand drawing required. The second approach uses a nail art pen to draw the heart outline directly, which produces sharper edges but requires slightly steadier hands.
Hearts work beautifully as accent nail details rather than full coverage on every finger. Place a single heart on your ring finger or thumb and keep the remaining nails in a complementary solid color. That restraint makes the heart feel intentional and chic rather than busy or overdone. Red hearts on a nude base are the classic choice for Valentine’s Day but hearts in white on black, or gold stripe nails paired with a single gold heart accent, work for any occasion year-round. Practice the double-dot technique on a piece of paper or the back of your hand before applying it to your nails. The motion becomes intuitive very quickly. Difficulty: two out of five.
Simple Flower Nail Art
Floral nail art sounds intimidating until you realize that a dotting tool can create a perfect five-petal flower in under thirty seconds. Five dots arranged in a loose circle, with a contrasting center dot placed on top that’s the entire technique. The result looks hand-crafted, delicate, and genuinely beautiful, especially on a clean nude or soft pastel base. This is one of the most rewarding easy nail designs in this guide precisely because the finished product looks far more complex than the process actually is.
Color combinations for simple nail art ideas in the floral category are nearly endless. White petals with a yellow center on a blush pink base feel spring-fresh and feminine. Lavender flowers with a gold center on a nude base feel elegant and elevated. Tiny red flowers on a cream base create a vintage, romantic quality. For a slightly more developed look, add a thin green stem and two small leaf strokes extending from the base of the flower using a toothpick dragged through green polish. That single additional detail transforms a simple dot flower into a mini botanical illustration. Floral nail art in this style works across every season by simply shifting the color palette warm terracotta florals for fall, icy blue and white for winter, bright multicolor for summer. Difficulty: two out of five. Time: twenty minutes.
Candy Stripe Nail Art
Stripe nail art in the candy cane style diagonal two-color stripes across the nail is cheerful, graphic, and achievable at home using either striping tape (for perfectly clean lines) or a thin liner brush (for a more hand-crafted feel). The tape method is the recommended approach for beginners because it removes the pressure of maintaining a perfectly straight line through polished technique alone. Let the tape do that work for you.
Here’s how the tape method works: Apply your base color and allow it to dry completely this is the most critical step, and rushing it is the most common reason tape nail art goes wrong. Once the base is fully dry, lay strips of striping tape diagonally across the nail at even intervals, leaving the stripe areas you want to paint exposed. Apply your second color over the entire nail, covering both the tape and the exposed areas. Wait approximately ten seconds, then carefully peel the tape away while the second color is still slightly wet. The tape pulls cleanly away, leaving crisp stripe edges that look salon-quality. Seal immediately with top coat. Classic red and white is the timeless candy stripe choice perfect for Christmas and Valentine’s Day. However, white stripe nails using white stripes over black create a graphic, modern look that works year-round. Pastel combinations mint and blush, lavender and yellow produce a soft, summery stripe design. Difficulty: two out of five with tape; three out of five freehand.
Feather Stroke Nail Art
Feather stroke nail art produces one of the most impressively organic-looking results for its actual difficulty level. The technique involves loading a fan brush or spreading the bristles of a thin liner brush wide with your fingers and dragging it across the nail in a single confident stroke. The spread bristles leave multiple thin lines simultaneously, creating a texture that genuinely resembles the delicate structure of a feather. The intentional imprecision of the stroke is what makes the design look so naturally beautiful.
This simple nail art idea works best in high-contrast color combinations where the feather lines read clearly against the base. White feather strokes on a deep navy base are striking and sophisticated. Gold on black creates an evening-ready design with real visual drama. Blush pink feather strokes on white feel soft and romantic. The key is committing to the stroke fully a slow, hesitant drag produces an uneven result, while a single confident pull from one side of the nail to the other creates the cleanest feather texture. Load your brush, position it at the edge of the nail, take a breath, and drag. Seal the finished design with a high-gloss top coat to intensify the color contrast and make the feather detail truly pop. Difficulty: two out of five.
DIY Nail Art Ideas You Can Do at Home
This section moves beyond the most basic designs into DIY nail art territory that’s slightly more visually dramatic while remaining completely achievable at home without professional tools or training. Wave designs, squiggles, half-and-half splits, and abstract color work all live here. These DIY nail designs at home represent the sweet spot between genuinely accessible and genuinely impressive. Your friends will absolutely ask how you did them.
What makes these four designs particularly well-suited to beginners is that they specifically embrace organic shapes and intentional imperfection. A slightly wobbly wave looks more interesting than a mechanically perfect one. An abstract brushstroke that “went wrong” often becomes the most striking detail in the finished design. These creative nail ideas reward a relaxed, confident approach far more than a tense, overcautious one. Loosen your grip, trust the brush, and enjoy the process.
Wave Nail Art
Wavy nail art is modern, versatile, and endlessly adaptable to different color palettes and aesthetics. The design is simply a curved line or multiple curved lines traveling across the nail from one edge to the other. On a white base with navy blue waves, it looks crisp and graphic. With pastel rainbow waves layered over white, it becomes playful and colorful. In gold on a deep burgundy base, it reads as sophisticated and elevated. The same fundamental technique produces completely different aesthetic results depending entirely on your color choices.
The tool for wave nail art is a thin liner brush or a nail art pen, both of which give you the control to guide a smooth curved stroke across the nail surface. Practice the wave motion first by drawing it on paper with a regular pen. Notice how your hand naturally wants to move a slow, steady curve that rises and falls across the page. That same motion translates directly to the nail. Start at one edge, curve upward in the middle of the nail, then arc back down toward the opposite edge. One wave per nail on shorter nails looks clean and proportional. Multiple overlapping waves in two or three colors create a maximalist effect that looks complex but uses the same basic stroke repeated with different colors. For trendy nail designs 2025, try white waves on a terracotta or deep olive base a combination that’s been dominating nail art feeds throughout the year. Difficulty: two out of five.
Squiggle Nail Art
Squiggle nail art might be the most beginner-friendly design in this entire guide and that includes polka dots. A squiggle is, by definition, an imprecise wavy line. Irregular, organic, slightly chaotic. That means there is genuinely no way to do it wrong. Every variation of the squiggle looks intentional because the design’s entire appeal is its loose, freehand energy. If your line wobbles unexpectedly, that’s not a mistake that’s the design working exactly as it should.
Use a nail art pen or thin liner brush and simply draw loose, curving lines across each nail. Vary the direction some nails horizontal, some diagonal, some with tight curves, some with wide arcs. Multicolor squiggles on a white base are the most popular version, with each squiggle in a different bright or pastel color. Black squiggles on a cream base create a graphic, illustrative look. Neon squiggles think graphic neon nails with electric pink, yellow, and orange lines on white feel bold and fashion-forward in a way that photographs brilliantly on social media. The squiggle nail trend blew up on TikTok in recent years and continues to appear consistently across nail art inspiration feeds in 2025. It’s accessible, expressive, and endlessly customizable. Difficulty: one out of five.
Half-and-Half Nails
Half-and-half nails split the nail down the middle into two distinct colors and the result is one of the most visually dynamic simple nail polish art designs available to beginners. The dividing line can run vertically down the center, diagonally from corner to corner, or horizontally across the midpoint of the nail. Each orientation creates a completely different visual effect from the same basic two-color concept.
Striping tape creates the clean dividing line that makes this design look precise and professional. Apply your first color to the entire nail and allow it to dry completely. Lay a strip of tape across the nail in your chosen direction, pressing down firmly along the entire length to prevent bleeding. Apply your second color to the exposed half of the nail, then peel the tape while the second color is still slightly wet. The result is a razor-sharp line between two colors that looks machine-cut in its precision. Color combination ideas that consistently work well: black and white for maximum graphic impact, nude and gold nails split vertically for quiet elegance, coral and mint for a summery freshness, deep burgundy and cream for fall. For an even more advanced variation, apply a matte top coat to one half and a glossy top coat to the other same color, two finishes, extraordinary visual effect. Difficulty: two out of five.
Abstract Nail Art
Abstract nail art is freedom in polish form. There are no rules, no correct shapes, no symmetry requirements, and no definition of “wrong.” You apply loose organic forms brushstroke marks, color blocks, curved shapes, overlapping lines in two or three complementary colors and the result is a modern manicure idea that looks like wearable contemporary art. Professional nail artists charge significant amounts for abstract designs that beginners can genuinely recreate at home using nothing more than a thin brush and three bottles of polish.
The key to keeping abstract nail designs looking intentional rather than accidental comes down to two decisions: limit your color count to two or three maximum, and repeat at least one color across multiple nails to create visual cohesion across the full hand. Warm neutrals ivory, dusty rose, soft caramel produce abstract nails that look sophisticated and editorial. Bold primaries red, blue, yellow on white create a more expressive, energetic result. Deep jewel tones plum, forest green, gold translate abstract work into something elegant and seasonally rich. Finish with a matte top coat for a gallery-worthy, artistic quality that distinguishes your abstract work from a standard glossy manicure. Difficulty: one out of five. This is the design where perfectionism actively works against you the more freely you apply the brush, the better it looks.
Easy Nail Art Using Tape and Simple Tools
Nail tape is arguably the greatest tool in the beginner nail art toolkit. It creates crisp, salon-quality edges without requiring years of practice or a naturally steady hand. Tape essentially acts as a temporary stencil you decide the shape, lay the tape, paint, and peel. The design creates itself. This section covers three easy nail art approaches that rely primarily on tape: geometric nail art, gold line nail art, and negative space nail art.
The golden rule of tape nail art applies universally across all three designs below: always let your base color dry completely before applying tape, and always peel the tape while your top color is still slightly wet for the sharpest, cleanest edge possible. Those two steps separate tape nail art that looks professional from tape nail art that looks like the color bled everywhere. Dry base coat. Wet top color. Peel immediately. Follow those three instructions and tape designs practically execute themselves.
Geometric Nail Art
Geometric nail patterns are among the most visually striking designs in the entire easy nail designs category and tape makes them accessible to everyone. Triangles, diamonds, color-blocked quadrants, chevrons all of these geometric shapes are achievable by simply positioning tape at different angles across a dry base color, painting over the exposed areas, and peeling to reveal clean geometric lines.
| Geometric Pattern | Tape Pieces Needed | Difficulty | Best Color Combo |
| Diagonal half | 1 piece | ⭐ | Black and white |
| Triangle tip | 2 pieces | ⭐⭐ | Nude and gold |
| Diamond center | 4 pieces | ⭐⭐⭐ | White and navy |
| Color block quadrant | 2 pieces | ⭐⭐ | Pastel combinations |
| Chevron | 2 pieces angled | ⭐⭐ | Black and cream |
The most beginner-friendly geometric option is the diagonal half: a single strip of tape placed diagonally across the nail creates two color zones with one clean line between them. From there, adding a second strip of tape at a different angle creates a triangle. A third strip creates more complex divisions. Each additional piece of tape adds one layer of geometric complexity without requiring any additional artistic skill just more careful tape placement. Geometric nail art in black and gold, nude and burgundy, or white and terracotta consistently produces results that look confident and fashion-forward. Difficulty: ranges from one to three out of five depending on design complexity.
Gold Line Nail Art
Gold stripe nails represent minimalist nail art at its most impactful. A single line of metallic gold running across a solid-color base transforms an ordinary manicure into something that looks genuinely expensive. The technique takes approximately two minutes per nail and produces results that people consistently mistake for professional salon work. It’s one of those minimalist nail art approaches where the simplicity of the design is precisely what makes it so effective.
You have two tool options for gold line nail art. The first is nail striping tape not the tape you use to mask sections, but actual metallic gold striping tape that you press directly onto the finished nail as the design itself, then seal with top coat. This is the most beginner-friendly approach because the line is already the perfect width and requires no steady hand at all. The second option is gold striping polish a bottle of metallic gold with an ultra-thin brush built into the cap which you paint directly onto the nail. This approach gives you more placement flexibility but requires a slightly steadier hand. For placement, a single horizontal line across the center of the nail is the most classic choice. A diagonal line feels more dynamic. Two parallel lines add structure. Gold stripe nails work on every base color but look particularly striking over deep navy, rich burgundy, dusty blush, and matte black. Difficulty: one out of five.
Negative Space Nail Art
Negative space nail art uses your natural nail as an active part of the design rather than a canvas to be completely covered. By leaving strategic areas of the nail unpainted against a colored background, you create a design that feels modern, graphic, and deliberately editorial. It’s one of the most genuinely trendy nail art approaches in the current landscape and simultaneously one of the most beginner-accessible techniques once you understand how tape makes it work.
The technique mirrors the geometric tape approach exactly, but with an important conceptual shift: the goal isn’t to cover the bare nail it’s to celebrate it. Apply tape to your bare nail (or a nude gel base in a skin-tone-matching shade) in your chosen pattern. Paint your color over the exposed areas. Peel the tape while the paint is still slightly wet. Where the tape was, your natural nail (or nude base) shows through and that contrast between the painted color and the bare nail creates the negative space nail art effect. Design ideas include a negative space French tip (bare tip against a painted base, the reverse of the traditional French manicure), a window pane grid (cross of bare nail visible within a painted field), and a diagonal bare strip cutting across a solid color. These modern manicure ideas photograph exceptionally well and look particularly sophisticated on medium to long nail lengths. Difficulty: two out of five.
French Tip Nail Art Ideas
The French manicure has been the most enduring nail design in beauty history and in 2025 it looks nothing like the stark white tips that defined it for decades. French tip nail art has evolved into a creative category in its own right, with color, angle, and embellishment pushing the classic silhouette into genuinely exciting new territory. For beginners, the French tip is an excellent first design because the technique is straightforward, the results are consistently wearable, and the modern variations allow for real personal expression.
The foundational French tip technique is simple: apply a nude or light base color, let it dry completely, then use either nail tip guides (available at every drugstore for under three dollars) or thin strips of striping tape to create a clean curved line at the tip of the nail. Paint your chosen tip color over the guide, remove the guide while the polish is still wet, and seal with top coat. That basic technique produces all three variations below. The only difference is the angle of the guide line and what you add at the end.
Diagonal French Tips
Diagonal French tips take the classic French silhouette and tilt it placing the tip color diagonally across the nail from one corner to the other rather than horizontally across the full width. The asymmetry feels fashion-forward and modern without abandoning the elegance that makes the French tip universally flattering. It’s one of the most effortlessly chic nail art approaches available for beginners who want to look current without attempting complex freehand designs.
Place your striping tape at a diagonal angle across the dry base color, running from the lower left corner to the upper right (or vice versa both orientations look equally intentional). Paint your tip color over the exposed diagonal area. Peel while wet. The diagonal line that emerges is crisp, clean, and looks deliberately designed. Color choices that work particularly well include chocolate brown on a nude base, deep burgundy on cream, metallic gold on a dusty blush base, and classic white on a sheer pink base. Almond nail designs and coffin shapes showcase diagonal French tips especially beautifully because the tapered tip geometry of both shapes echoes and amplifies the asymmetric angle of the diagonal line. Difficulty: two out of five.
Chevron French Tips
Chevron French nails replace the traditional horizontal or diagonal tip line with a V-shape pointing toward the center of the nail a graphic, bold design that gives the French tip a completely different visual energy. The chevron reads as geometric and deliberate, borrowing the structural confidence of geometric nail art and applying it to the French tip format. It’s one of the most commented-on nail art inspiration looks when done well.
Create the V-shape by placing two strips of striping tape from the outer corners of the nail tip inward toward the center, meeting at a point. The angle between the two pieces of tape determines how sharp or gentle the V appears a narrow angle creates a dramatic pointed chevron, a wide angle creates a softer, more subtle version. Paint your tip color over the V-shaped exposed area, then peel both pieces of tape simultaneously while the polish is still wet. Color combination ideas: a classic white V on a nude base stays closest to the traditional French spirit. A black V on cream feels graphic and editorial. A metallic gold V on deep navy creates a jewel-tone manicure quality that looks genuinely luxurious. Coffin nail designs work particularly well for chevron French nails because the flat tip width provides ample space for the V’s geometry to read clearly. Difficulty: two out of five.
Embellished French Tips
Embellished French manicure takes any completed French tip and adds a line of rhinestones, micro pearls, or gold foil pressed along the tip line transforming a clean, simple design into something that looks genuinely occasion-worthy. The embellishment detail sits exactly where the eye naturally travels on a French manicure anyway (along the tip line) so the effect is simultaneously subtle and striking. It’s the kind of finishing touch that makes easy salon-inspired nails look like they cost significantly more than they did.
The application is straightforward once you have the right tools. Complete your French tip in your chosen color. Apply a thin bead of fresh top coat along the tip line while it’s still wet. Using tweezers, press tiny rhinestones, flat-backed micro pearls, or small pieces of nail foil directly into the wet top coat bead, positioning them as close together as possible along the tip edge. Work quickly before the top coat sets. Once all embellishments are placed, seal the entire nail with another layer of top coat, pressing down gently over the embellishments to encapsulate them. The result is a finished nail that looks like genuine jewelry work appropriate for weddings, formal events, holiday parties, and any occasion where you want your manicure to feel like an intentional accessory rather than simply maintained nails. Difficulty: two out of five.
Read More About: 55 French Tip Nail Designs That Are Chic, Trendy & Timeless
Cute Nail Art Designs for Every Season
Some cute nail designs transcend seasonal trends and work beautifully regardless of when you wear them. The four designs in this section rainbow nail art, star accent nails, smiley face nails, and evil eye manicure are cheerful, expressive, and endlessly versatile. Each one adapts to different seasons simply by shifting the color palette: pastels for spring, neons for summer, jewel tones for fall, icy metallics for winter. The technique stays identical. Only the colors change.
These designs also share another important quality: they’re beginner nail art tutorial-friendly in the truest sense. None requires expensive tools. None demands a level of precision that takes months to develop. And all four produce results that look genuinely creative and personality-packed rather than generic or safe. Wear these designs when you want your nails to start conversations and reflect something real about your personality.
Rainbow Nail Art
Rainbow nail art is simultaneously the simplest and most joyful design in this entire guide. In its most beginner-accessible form the skittle version it requires no art skill whatsoever. Paint each nail a different color of the rainbow: red, orange, yellow, green, blue, indigo, violet. Done. The result is instantly colorful, genuinely fun, and endlessly compliment-worthy. Mismatched pastel nails take the same concept into a softer register lavender, mint, blush, baby yellow, sky blue creating a color story that feels dreamy and cohesive without matching.
For a slightly more advanced version, paint a rainbow arc directly onto a white base using a thin liner brush. Start with red at the bottom curve of the arc, work upward through orange, yellow, green, and finish with blue and violet at the top. Each color stroke curves in the same arc direction across the nail. The painted arc version looks more intricate than the skittle approach but uses the same basic curved brushstroke repeated in different colors. Rainbow nail art spikes in popularity every June for Pride Month but genuinely works year-round as an expression of color confidence and playful personal style. Colorful nail designs in the rainbow family are among the most saved and shared on Pinterest, making them excellent content for anyone building a nail art social presence. Difficulty: one out of five for skittle version; three out of five for painted arc.
Star Nail Art
Star accent nails bring a celestial, slightly mystical quality to any manicure and they’re far more accessible than they look. The easiest approach uses star nail stickers, which require zero artistic input: peel, position, press, seal with top coat. Gold stars on navy, silver stars on black, white stars on deep plum any combination looks intentional and beautiful with sticker-based application. This is genuinely one-out-of-five difficulty for genuinely stunning results.
For those who want to paint their stars freehand, here’s a technique that makes the five-pointed shape dramatically easier to execute: draw an X shape first using your nail art pen, establishing four of the five points. Then add the top vertical point connecting at the center of the X. This approach breaks the star into two simple overlapping strokes rather than requiring you to draw the full shape in one continuous motion. Practice on paper a few times until the X-plus-point motion feels natural. Star accent nails work beautifully on a single accent nail against solid complementary colors on the remaining fingers one nail with three tiny gold stars against four deep navy nails creates a night-sky effect that looks sophisticated and deliberate. Seasonal versatility is exceptional: Fourth of July in red, white, and blue; Christmas in gold and red; New Year’s Eve in silver; everyday celestial aesthetic in black and gold. Difficulty: one out of five with stickers; three out of five freehand.
Smiley Face Nail Art
Smiley face nails are one of 2025’s most persistent trendy nail designs and they’ve been so popular for so long at this point that they’ve fully crossed from trend into classic status. The design is simple, cheerful, and unmistakably retro in the best way. A yellow base, two black dots for eyes, a curved black line for the smile that’s the complete design in its most basic form. Add two small pink dots for rosy cheeks if you want extra personality. The whole process takes under two minutes per nail.
For the eyes, use your dotting tool loaded with black polish. Place two dots evenly spaced in the upper-middle area of the nail, with enough space between them to read as a face. For the smile, use a thin liner brush or nail art pen, drawing a gentle upward-curved line below and between the eyes. The curve doesn’t need to be perfect a slightly asymmetric smile often looks more characterful and human than a mechanically perfect arc. Advanced variations include a retro groovy smiley with thick outlines and daisy-shaped pupils (replacing simple dot eyes with tiny five-petal flowers), and an abstract smiley where the face is rendered in loose, imprecise strokes for an illustrative quality. TikTok has accumulated millions of views of smiley face nails tutorials, confirming this as one of the most searched nail art inspiration references of recent years. Difficulty: two out of five.
Evil Eye Nail Art
The evil eye manicure is the most technically demanding design in this section and simultaneously one of the most rewarding to master. The evil eye motif, rooted in Mediterranean and Middle Eastern cultural tradition as a protective symbol against negative energy, translates into nail art as a series of concentric circles: a large outer circle, progressively smaller circles layered on top, finishing with a dark center dot and a white highlight. The precision of the concentric circles is what makes the design distinctive and a set of dotting tools in three different sizes makes that precision achievable.
Here’s the technique broken into clear steps. First, apply your base color white or nude creates the clearest contrast for the evil eye design. Using your largest dotting tool loaded with bright blue polish, create a large filled circle in the center of the nail. Allow it to dry for sixty seconds. Using a medium dotting tool loaded with white polish, create a smaller white circle centered exactly on top of the blue one. Allow that to dry. Using a small dotting tool loaded with blue again, create an even smaller blue circle centered on the white. Finally, use your smallest dotting tool or a toothpick to place a black dot at the very center, followed immediately by a tiny white highlight dot slightly off-center on the black. That white highlight creates the light-catching quality that makes evil eye designs look dimensional and genuinely impressive. Traditional color is blue, white, and black but the design adapts beautifully in purple, green, or even pink for a playful variation. Difficulty: three out of five.
Trendy Nail Art Designs to Try This Year
Trending nail art inspiration for 2025 centers around four specific techniques that have demonstrated serious staying power: cat-eye nails, aura nails, chrome nails, and velvet nails. Three of these four designs require specific products that can’t be substituted with regular nail polish cat-eye gel needs a magnet, chrome needs chrome powder, and velvet needs a specific suede powder. Aura nails, however, require nothing beyond what you already have in your polish collection, making them the most immediately accessible trendy design for beginners.
The investment required for cat-eye, chrome, and velvet nail art is real but modest. A basic gel starter kit lamp, gel base, gel top coat, and a couple of gel colors runs approximately thirty to sixty dollars. Chrome powder sets start at ten to fifteen dollars. Once you have the equipment, the per-manicure cost drops to essentially nothing. These trendy nail art approaches consistently produce results that look genuinely professional and current and learning them now means you’re working with techniques that continue to evolve and offer new creative directions each season.
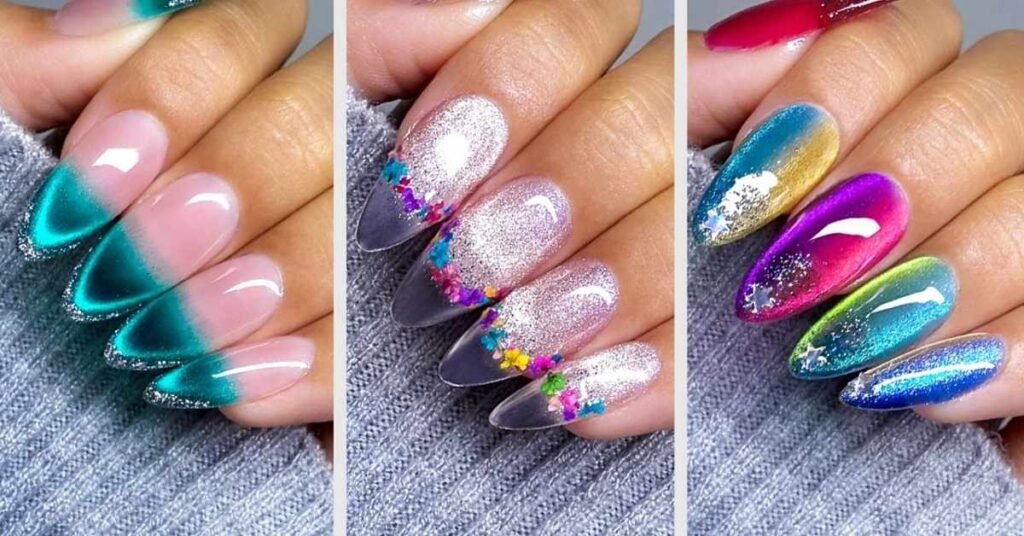
Cat-Eye Nail Art
Cat-eye nails use a magnetic gel polish containing fine metallic particles that respond to a magnet held close over the wet nail surface. The magnet pulls those particles into a stripe pattern across the nail creating a light-catching linear effect that genuinely resembles the reflective slit pupil of a cat’s eye. The effect is three-dimensional, dynamic, and unlike anything achievable with regular nail polish. It catches light differently from every angle and looks undeniably professional.
The process requires a UV/LED lamp and cat-eye specific gel polish both of which represent an investment but open up a huge range of subsequent gel nail designs beyond just the cat-eye technique. Apply one thin coat of your cat-eye gel, hold the cat-eye magnet tool (usually included with the polish, or available separately for under five dollars) about two to three millimeters above the nail for ten seconds while the gel is still uncured watching the metallic stripe form in real time is genuinely satisfying then cure the nail under your lamp without moving the magnetic effect. The stripe is locked in place. Color options for cat-eye nails include classic silver on black for maximum drama, deep gold on burgundy for a rich autumnal feel, and green shimmer on forest green for a tonal, sophisticated effect. Difficulty: two out of five once you have the products. First-time application success rate is very high.
Aura Nail Art
Aura nails create a soft, luminous, watercolor-like glow emanating from the center of the nail and they’re the only truly trendy technique in this section that requires no special products or gel equipment. Regular polish, a small brush, and a cotton swab are the complete toolkit. The effect looks ethereal and complex. The process is genuinely simple and beginner-friendly.
Start with a light or neutral base color white, sheer nude, or soft beige all work beautifully. Allow the base to dry to a slight tackiness rather than completely hard this is important, because blending into a tacky surface produces softer, more seamless edges than blending into a fully dry one. Using a thin brush, dab a contrasting or complementary color in the center of the nail, or along one side for an asymmetric aura effect. Then, using a dry brush or cotton swab, blend the edges of the color outward in quick, light circular motions. The goal is a soft gradient that fades from intense color at the center to the base color at the edges with no harsh line between them. Aura nails look particularly beautiful in purple on white, orange on beige, and soft pink on cream. The aura nail trend exploded on TikTok during 2023 and has remained consistently popular through 2025, appearing across nail art inspiration feeds in every color imaginable. Difficulty: two out of five.
Chrome Nail Art
Chrome nails deliver a mirror-like metallic finish that looks like liquid metal has been poured onto your fingertips and the technique for achieving it is more accessible than most beginners expect. The key product is chrome powder: a ultra-fine metallic pigment that’s rubbed over a cured gel base using an eyeshadow applicator or finger, creating the mirror effect through friction and adhesion to the gel surface.
The step-by-step process is straightforward: apply a rubber base gel to your nail and cure it under your LED lamp. Without applying any additional product, take a small eyeshadow applicator loaded with chrome powder and rub it over the cured rubber base in firm, circular motions. Watch the mirror effect develop it’s genuinely one of the most satisfying processes in nail art. Once the full chrome effect is achieved, seal with a no-wipe gel top coat and cure again. The no-wipe formulation is important: a regular top coat that requires wiping will disturb the chrome surface and reduce its reflectivity. Color options are extensive and constantly expanding silver chrome for a classic mirror finish, gold chrome for a luxurious warm metallic, rose gold chrome for a soft romantic effect, and aurora/duochrome powders that shift color from different angles. Chrome powder kits start at ten to fifteen dollars on and each pot contains enough product for dozens of manicures. Difficulty: two out of five with the right products.
Velvet Nail Art
Velvet nails create a rich, soft, three-dimensional texture that genuinely looks and feels like fabric wrapped around your fingertips. The technique is closely related to chrome nails but uses a deeper, more saturated gel base color and a specific velvet or suede chrome powder formulated to produce a soft, non-reflective finish rather than a mirror shine. The result is a nail surface with tactile dimension matte on the surface but with a depth and richness that regular matte polish simply cannot replicate.
Deep jewel tones perform best with the velvet technique: deep plum nails in velvet look like dark amethyst, forest green nails in velvet look like emerald fabric, and wine burgundy in velvet creates a surface that looks almost like crushed velvet upholstery. The application process mirrors chrome: cure your gel base, rub velvet powder over the cured surface in circular motions, seal with a matte no-wipe top coat, and cure again. The matte top coat is essential a glossy sealant destroys the velvet quality and turns the finish into something closer to standard chrome. Velvet nails transition beautifully from fall into winter, making them one of the most seasonally resonant techniques available. Difficulty: two out of five essentially identical to chrome nail application with a different powder and top coat.
DIY Nail Art by Nail Shape

Your nail shape isn’t just a personal preference it actively determines which DIY nail designs at home look proportional and genuinely flattering. A design that looks breathtaking on a long coffin nail can look cramped and awkward on a very short square nail. Understanding this relationship saves beginners enormous amounts of frustrated practice time and ensures that every design you choose genuinely works for your specific hands rather than just for someone else’s in a reference photo.
| Nail Shape | Best DIY Designs | Designs to Avoid |
| Short square | Dot nail art, solid glazed, simple flowers, French tips | Complex multi-element art, full ombré |
| Oval | French tips, florals, aura nails, wavy lines | Wide geometric patterns |
| Almond | Ombré, minimalist nail art, gold linear, diagonals | Polka dot heavy patterns |
| Coffin | Velvet nails, dark glazed, embellished French, color blocks | Tiny detailed micro art |
| Stiletto | Editorial dark nails, abstract nail designs, mystical art | Conservative minimal designs |
| Squoval | Nearly every design in this guide the most versatile shape | Very few restrictions |
Nail Art for Short Nails
Short nail art ideas are completely misunderstood by most beginners who assume nail art requires length. It doesn’t. Short nails are actually excellent canvases for beginner nail art compact designs look intentional and refined on shorter lengths, the maintenance burden is lower, and the risk of a design looking overcrowded is reduced. The key is choosing designs that respect the scale of the nail rather than fighting against it.
The most effective approach for short nail designs is the accent nail strategy: keep four nails in a solid, well-chosen color and apply your chosen nail art design to one accent nail per hand. A single nail with detailed art against four clean solid nails looks more sophisticated than ten nails with competing designs. Specific simple nail art ideas that translate beautifully to shorter lengths include polka dot designs (scale the dots smaller), simple dot nail art flowers, clean French tips with thin tip lines, smiley faces, single stars, and negative space nail art. Designs to approach carefully on very short nails include full ombré gradients (the color transition gets compressed), and very detailed freehand art where fine elements require more canvas space to read clearly. Everything else in this guide works well on short nails with appropriate scaling.
Almond Nail Art Designs
Almond nail designs benefit from one of the most elegant nail shapes available: tapered to a rounded point, elongating the finger visually, and providing a canvas that naturally directs the eye from the wide nail base toward the narrowed tip. This organic elongation interacts beautifully with gradient designs, delicate detail work, and linear nail art in ways that shorter shapes simply cannot replicate.
Caramel ombré and gradient designs look especially stunning on almond shapes because the color transition naturally follows the narrowing of the nail toward the tip the ombré appears to flow continuously from base to point. Floral nail art with delicate micro blooms sits beautifully on the slightly wider mid-nail area of almond shapes, with the flowers reading clearly against the available canvas. Gold stripe nails on almond nails produce a particularly elegant result: the gold line travels from the wider base toward the tapered tip, creating a movement and directionality that feels dynamic and intentional. Diagonal French tips on almond shapes are another outstanding combination the asymmetric angle of the diagonal tip line mirrors and amplifies the inherent asymmetry of the almond shape itself. If you currently wear square or round nails and want a shape upgrade that enhances most beginner nail art designs, almond is the most universally flattering transition.
Coffin Nail Art Designs
Coffin nail designs work with one of the most dramatic and photogenic nail shapes currently popular in the USA. Flat-tipped, tapered on the sides, resembling a coffin or ballerina slipper this shape provides a wide, flat tip canvas that’s ideal for detailed art, geometric designs, and statement embellishment work. The flat tip is particularly forgiving for stamping designs because the flat surface makes clean stamp contact easier to achieve than on curved or pointed shapes.
The best DIY nail designs at home for coffin shapes include velvet nails in deep jewel tones (where the wide flat tip provides maximum visual impact for the texture), chrome nails for a mirror metallic effect across that generous tip canvas, embellished French manicure designs where rhinestones or pearls line the full width of the flat tip, and bold ombré gradients where the color transition has enough canvas length to breathe and develop properly. Medium coffin length not excessively long, just enough for the tapered sides and flat tip to read clearly is the recommended starting point for daily wear. Very long coffin nails look extraordinary but require more careful maintenance and carry a higher risk of breakage during regular activities. For natural nails, medium coffin length is achievable on most hands if nails are allowed to grow to approximately the end of the fingertip before shaping begins.
Beginner Nail Art Without Tools
No dotting tool? No liner brush? No nail art pen? Genuinely no problem. Some of the most creative and impressive beginner nail art results in this guide require nothing beyond what’s already sitting in your kitchen drawer right now. A toothpick, a bobby pin, a strip of scotch tape, a makeup sponge these household staples substitute effectively for nearly every specialized nail art tool that exists. This section proves definitively that homemade nail art doesn’t require a single specialized purchase.
The designs achievable without dedicated tools aren’t limited to “basic” or “simple” results either. Marble effects, gradient ombré, floral patterns, dot designs, and feather strokes are all achievable with household substitutions. Mastering these improvisational approaches also teaches you exactly which dedicated tools are genuinely worth buying afterward because you’ll understand from experience what they do differently, rather than purchasing tools blindly based on product descriptions.
Toothpick Nail Art Designs
A toothpick is simultaneously a dotting tool, a liner, a detail pen, and a marble stylus four dedicated nail art tools in one implement that costs approximately one cent. The rounded tip creates clean, consistent dots when dipped in polish and pressed onto the nail. The pointed tip drags delicate lines through wet polish when pulled with light pressure. Dragged through two overlapping colors of still-wet polish, the toothpick creates the swirling, organic patterns of marble nail art with remarkable ease.
The five-dot flower technique works perfectly with a toothpick: dip the rounded end in your chosen petal color, place five dots in a rough circle, then switch to your center color and add one dot in the middle. The flower is complete in under thirty seconds. For marble effects, apply two or three colors of polish directly onto the nail in rough patches without blending, then drag the toothpick through them in curving, irregular strokes. The colors blend and swirl where the toothpick passes through, creating the characteristic veining of marble. Work quickly the technique requires wet polish throughout, so speed matters. These nail art hacks using toothpicks represent some of the most cost-effective techniques in the entire beginner nail art world.
Bobby Pin Nail Art Hacks
The humble bobby pin creates dots of remarkably similar quality to a dedicated dotting tool and most people have a dozen of them rattling around in a bathroom drawer right now. The rounded closed end of the bobby pin is your dotting surface: dip it in polish, blot once on paper to remove excess, then press firmly and evenly onto the nail for a clean, consistent circle. Different bobby pin sizes and thicknesses produce slightly different dot sizes, so collecting a few from different sets gives you a range comparable to a basic dotting tool set.
Bobby pin nail art hacks extend beyond simple dotting as well. The open end of the bobby pin the two-pronged U-shape acts as a guide for creating two perfectly parallel thin lines simultaneously when dragged through wet polish. The folded center point creates an elongated oval mark when pressed onto the nail. These variations expand the creative range of this single household tool considerably. The bobby pin is particularly effective for the evil eye nail art concentric circles described earlier in this guide the different pin sizes and positions create circle variations that approximate the effect of a multi-size dotting tool set. For beginner manicure tips that save money without sacrificing quality, the bobby pin dotting technique is consistently the most recommended starting point.
Dotting Tool Alternatives
Every specialized nail art tool has at least one household substitute that performs comparably for beginner-level work. The table below gives you a complete quick-reference guide before you invest in any dedicated equipment:
| Household Item | Replaces | Best Nail Art Use |
| Toothpick | Liner brush, dotting tool | Dots, lines, flowers, marble |
| Bobby pin | Dotting tool | Dots, circles, evil eye |
| Pencil eraser end | Large dotting tool | Large dots, flower petals |
| Scotch tape | Nail striping tape | Clean edges, French tips |
| Makeup sponge | Gradient sponge tool | Ombré, mismatched pastel nails |
| Fan brush | Feather brush | Feather stroke designs |
| Plastic wrap | Texture tool | Organic crinkle texture |
| Thin paintbrush | Striping brush nail art | Lines, details, stripes |
| Sandwich bag corner | Gradient tool | Soft blended effects |
| Nail clipper flat end | Flat stamp | Simple geometric impressions |
Understanding these substitutions gives you real creative freedom as a beginner. You can explore the full range of easy nail art designs in this guide without spending anything beyond the polish you already own. Once you’ve practiced with these substitutes and identified which designs you return to most often, you’ll know exactly which dedicated tools are worth adding to your kit.
Nail Art Color Combinations That Always Work
Color choice can single-handedly determine whether a nail design looks intentional and polished or busy and confused. Even a technically perfect dot pattern looks wrong if the colors fight each other. The good news: certain color pairings have been proven by color theory and by millions of successful manicures to work beautifully together every single time. These combinations are beginner manicure tips gold they’re forgiving of slight technical imprecision because the color contrast does the visual heavy lifting.
This section covers three foundational color pairings that consistently deliver strong nail polish designs: black and white nail art for maximum graphic impact, nude and gold nails for quiet elegance, and pastel manicure combinations for soft, dreamy versatility. Master these three palettes and you’ll have a reliable color foundation that supports every design technique covered in this guide.
Black and White Nail Art
Black and white nail art is the highest-contrast color combination available to nail artists and that contrast is precisely what makes it so powerful for beginners. When your colors are maximally different from each other, every design element reads with absolute clarity. A slightly wobbly line still reads clearly as a line. A slightly irregular circle still reads clearly as a circle. The eye focuses on the dramatic color contrast rather than on any slight technical imperfections in the execution.
This combination works across virtually every design in this guide: geometric nail patterns in black and white are graphic and sophisticated; polka dots in either direction (white on black or black on white) are classic and endlessly wearable; abstract nail designs in black and white feel like contemporary fine art; checkerboard patterns using nail tape create a bold retro fashion statement; French tips in black on white create an unexpected, editorial version of the classic design. Finish options add an additional layer of creative control a matte top coat on black and white nail art creates a modern, fashion-forward quality that reads as deliberate and current, while a glossy finish gives the design a more traditional lacquered quality. Either finish works beautifully and the choice comes down entirely to personal aesthetic preference.
Nude and Gold Nail Art
Nude and gold nails represent the combination that most consistently produces results that look expensive, sophisticated, and genuinely professional regardless of the technical skill level of the application. Gold is an extraordinarily forgiving accent color because its visual warmth and richness commands attention in a way that draws the eye toward the overall effect rather than toward any slight imprecision in placement or line quality. A slightly wobbly gold line on a nude base still looks elegant. A slightly uneven gold French tip still looks luxurious.
The nude base itself deserves careful selection. Peachy nude shades work most harmoniously with warm skin tones. Pink nude bases complement cool undertones. True beige nudes work beautifully as genuine neutrals across all skin tones. Over any of these base options, gold details in the form of gold stripe nails, gilded half moon nails (a half-moon shape at the nail base in gold against a nude field), embellished tip lines, or simple polka dots all produce results that photograph beautifully and translate successfully across casual and formal occasions. Nude and gold nails are the combination most likely to produce your first “these look professional” moment as a beginner and that early confidence boost is invaluable for building enthusiasm and practice consistency.
Pastel Nail Art Designs
Pastel manicure designs are beginner-friendly in a specific technical sense that makes them ideal for anyone just starting out: pastel pigments are naturally sheer and light, which means slight unevenness in application is far less visible than with deeply saturated colors. A slightly uneven second coat of lavender polish looks far more forgiving than a slightly uneven coat of deep burgundy. That inherent forgiveness makes pastel nail art designs genuinely kind to beginners who are still developing their application technique.
Mismatched pastel nails one pastel shade per nail across the full hand require zero art skill and consistently produce results that look intentional, cohesive, and fashion-forward. The secret is selecting pastels from the same tonal family: all warm pastels together (peach, blush, butter yellow, coral) or all cool pastels together (lavender, mint, sky blue, ice pink). Mixing warm and cool pastels across the same hand creates a slightly discordant effect. Staying within one tonal family creates cohesion that makes the mismatched concept look curated rather than random. Pastel ombré gradients are another excellent beginner technique two adjacent pastels (lavender and mint, for example) on a makeup sponge blend seamlessly because their similar tonal values make the transition almost effortless. Always apply a white base coat before pastel shades to maximize their vibrancy, since pastel pigments are naturally sheer and will appear muted over a bare nail or colored base.
Common Nail Art Mistakes Beginners Make
Every beginner makes these mistakes. Knowing about them in advance doesn’t guarantee you’ll avoid them entirely but it does mean you’ll recognize them faster when they happen and understand exactly how to fix them. The three most common beginner nail art errors are also the three most consequential each one undermines the quality of the finished result in a significant, visible way. The encouraging news: all three are completely fixable with minor adjustments that cost no additional time or money.
In fact, fixing two of them actually saves time. Understanding these mistakes before your first attempt puts you ahead of the vast majority of people who learn them only through repeated failed manicures. Consider this section your shortcut past the most common frustrations of learning DIY nail art at home.
Using Too Much Polish
Too much polish is the single most universal beginner nail art mistake and it causes a cascade of problems that compound each other. Thick applications flood the cuticle area immediately, creating messy edges that require cleanup. The uneven surface texture from thick application causes nail art details painted on top to sit unevenly, making fine lines and dots look blurry rather than crisp. Extreme slow drying time means designs smudge from accidental contact long after you think they’ve set. And thick coats are far more prone to bubbling, wrinkling, and peeling than thin ones.
The fix is both simple and absolute: two thin coats always outperform one thick coat, every single time, without a single exception. A correctly loaded brush glides easily across the nail surface with minimal friction. If the brush is dragging, pulling, or leaving uneven ridges behind it, there’s too much polish on the brush. The correct technique: dip the brush, then wipe one side of the brush against the neck of the polish bottle to remove approximately half the product. Apply the remaining product across the nail in three strokes one down the center, one down each side using smooth, light-pressure movements. That’s a thin coat. Build up with a second thin coat after the first has dried and the result will be richer, smoother, and more even than any single thick application.
Skipping Base Coat
Base coat is the most skipped step in the beginner nail art routine and the consequences are both immediate and long-term. The immediate consequence is reduced polish adhesion: without the grip that base coat provides, even thin, well-applied polish coats begin lifting at the edges within two to three days rather than lasting the full five to seven days that proper technique delivers. The long-term consequence is nail staining: wearing deep-colored polishes burgundy, navy, black, dark green directly on an unprotected nail plate transfers color pigment into the nail, leaving yellowish or tinted discoloration that takes weeks to grow out.
Base coat application takes approximately ninety seconds per hand. That modest time investment dramatically extends your manicure’s lifespan and protects your nails from the staining damage that deep colors cause on direct contact. Quality base coat options that perform well and are widely available in the USA include OPI Natural Nail Base Coat and Essie Here to Stay both available at drugstores nationwide and on for under twelve dollars. Apply base coat to every single manicure, every single time, without exception. It’s not optional prep work it’s the structural foundation that everything else rests on.
Rushing Dry Time
Impatience ruins more beginner nail art attempts than poor technique. This is perhaps the most honest truth in the entire guide. The temptation to check if your nails are dry by touching them, to apply the second coat before the first is fully set, or to add top coat while the art underneath is still slightly tacky these small moments of impatience each cause specific, visible damage that can’t be fixed without starting over.
Touching wet nails leaves fingerprint dents that look exactly like what they are. Applying a second color coat before the first is dry causes drag marks and bubbles as the brush disturbs the still-wet layer beneath. Applying top coat over slightly tacky nail art smears the design and creates a blurry, muddy finish where crisp, defined details existed seconds before. Standard dry times to respect: base coat needs sixty to ninety seconds. Each color coat needs two to three minutes. Top coat needs five minutes minimum before any contact. The practical solution that removes guesswork entirely: set a timer on your phone between every single coat. It adds approximately ten minutes to your total manicure time. In exchange, it multiplies your manicure’s longevity by days and prevents every single drying-related mistake listed above. Quick-dry top coats like Seche Vite and nail drying drops also accelerate the process significantly for days when patience is genuinely limited.
Frequently Asked Questions About Nail Art
What is the easiest nail art for beginners?
Polka dot nail art using a dotting tool or a bobby pin is the easiest starting point for any beginner. It requires no artistic skill, uses a single repeated action, and produces consistent results on the very first attempt. The second easiest option is squiggle nail art using a nail art pen because squiggles are intentionally imprecise, there’s genuinely no way to make them look wrong. Abstract nail designs are the third recommendation: they embrace organic shapes and intentional imperfection as core design elements. Any design in this guide rated one or two out of five on the difficulty scale is genuinely achievable on a first attempt with minimal practice. Start with whatever design excites you most visually rather than defaulting to what seems technically safest motivation and enthusiasm produce better beginner results than cautious risk-avoidance.
How can I do nail art at home?
DIY nail art at home follows a consistent five-step process regardless of which specific design you’re creating. Step one: prepare your nails thoroughly file, buff, push back cuticles, dehydrate the nail plate. Step two: apply base coat and allow it to dry completely. Step three: apply your chosen base color in two thin coats, allowing each coat to dry between applications. Step four: apply your nail art design using your chosen technique dots, tape, freehand brush work, or a combination. Step five: seal everything with a quality top coat and allow it to dry fully before using your hands. Free learning resources are extraordinarily accessible: has accumulated billions of views of beginner nail art tutorial content. Pinterest nail art boards offer thousands of visual references and step-by-step photo guides. YouTube channels dedicated to easy nail designs provide detailed video tutorials for virtually every technique in this guide. Practice on your non-dominant hand first it removes the pressure of “ruining” your better hand and builds skill faster because the lower-stakes environment encourages freer experimentation.
What tools do I need for nail art?
The minimum viable nail art tools kit for a beginner covers six essentials: a dotting tool, a thin liner brush, a nail art pen, striping tape, base coat, and top coat. These six items cover the majority of easy nail art designs in this guide and the complete kit costs under twenty dollars when purchased from budget-friendly brands. Optional additions that significantly expand your design range include stamping plates and a stamp roller, rhinestones and micro pearls, nail foil for metallic effects, and nail stickers for quick designs without any technical skill required. For those not ready to purchase anything at all, the household substitution table in the Beginner Nail Art Without Tools section above covers toothpick, bobby pin, scotch tape, and makeup sponge replacements that perform comparably for beginner-level work across most designs.
Can beginners do nail art without tools?
Yes and the evidence is throughout this guide. Toothpicks, bobby pins, scotch tape, makeup sponges, pencil erasers, and thin paintbrushes from craft stores substitute effectively for nearly every dedicated nail art tool at the beginner level. The full household substitute table in the Beginner Nail Art Without Tools section above lists ten substitutions covering every major tool category. Designs achievable without any dedicated tools include polka dots, five-dot flowers, marble effects, ombré gradients, basic line work, hearts via the double-dot technique, squiggles, and tape-based geometric designs using scotch tape in place of nail striping tape. Starting with household items before purchasing dedicated tools is actually strategically smart: it tells you which techniques you genuinely enjoy and which tools you’ll actually use, making your eventual tool purchases more targeted and more worthwhile.
How long does DIY nail art last?
DIY nail art at home with regular nail polish lasts five to seven days on average before chipping begins assuming proper preparation, thin coats, and a quality top coat seal. Several factors extend this lifespan significantly: refreshing the top coat layer every two to three days adds approximately two to three additional days of chip-free wear. Avoiding hot water and harsh cleaning products during the first hour after application prevents early lifting. Using a quality dehydrator during nail prep maximizes adhesion from the first coat. Gel-based nail art at home extends longevity to ten to fourteen days with proper preparation and a quality UV/LED lamp the gel formula creates a durable, flexible seal over the nail that regular polish cannot match. Factors that reduce longevity regardless of technique include manual work that stresses the nail tips, frequent swimming or dishwashing without gloves, and any lifestyle that requires using fingertips as tools. For a quick repair when a single nail chips before the rest, apply a thin layer of top coat directly over the chipped area it extends the compromised nail by one to two additional days while the rest of the manicure continues looking fresh.
Conclusion
There are 45 easy nail designs in this guide and every single one is genuinely within your reach right now. Not after years of practice. Not after hundreds of dollars of equipment investment. Right now, with what you already have and what you’ve just learned. Beginner nail art isn’t a destination you arrive at after passing some invisible competence threshold. It’s something you begin the moment you decide to try.
The designs in this guide range from the genuinely foolproof squiggles, polka dots, rainbow skittles to the satisfyingly ambitious: cat-eye nails, chrome nails, evil eye manicure. Every step of that journey is covered here. You have the tool knowledge, the technique breakdowns, the color combinations that always work, and the honest explanation of the mistakes to avoid. The only thing left is picking up a polish bottle and starting. Choose the design that made you smile while reading this guide. Set your timer between coats. Apply thin layers with patience. And when you finish share it. The DIY nail art community is one of the warmest, most encouraging corners of the beauty world, and your first attempt absolutely deserves to be celebrated.


